|
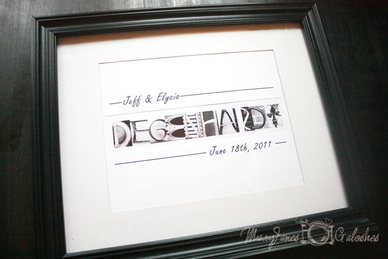 |
Today I thought I would walk you through how I make my go to wedding gift! So let's get started.
What you need-
A high quality set of letter images
A frame
Photo editing program (my tutorial uses Photoshop Elements, I love PSE! Artistic Letters has an awesome tutorial using a free photo program if you don't have one you love.)
Printer
Glossy photo paper
Matte photo paper (or other quality matte card stock)
Paper cutter or razor knife
*Important* I'm embarrassed to admit this, but I think it's only fair to share because it's somewhat funny..... make SURE you check your spelling! When my cousin got married I failed to notice that her husband spelled his name unconventionally :( Not only did I mess up his first name, but his last name! Hello!!! A misspelled personalized gift! Oh Taylor! Luckily it was my cousin whom loves me anyway, imagine if it were someone I wasn't as close to! So so embarrassing, so don't assume that the spelling is traditional, check the wedding invitation, and double, triple, check your finished work!
Jodi has created several images for each letter as you can see from the files below, so you won't need to duplicate your repeating letters!

Setting up your new document. I wanted my final product to fit on a standard sheet of paper and fit an 8x10 matte. Although I'm printing on an 8.5x11 inch standard size paper, I created my document at 8x10 so that it would fit my matte properly.

If our using a different photo editing program (any one will work!) you will probably have to open all your letter files and drag them onto your document..... BUT if your using PSE like I am here's a little trick! Go to file, PLACE. Choose your image and it automatically puts your image onto your existing document. This really keeps my workspace from getting cluttered with a bunch of open files.

You will need to shrink your letters a bit as you place them all on your document. Don't worry to much about sizing until you have them all there. It will be different every time depending on the length of the last name. So here is my rough document of all my open letters.

At this point I turned on my grid (view, grid) so that I could align all my letters as I started to shrink them to fit on one line. Drag and re-size the letters until they are all on the same line. Make sure the edges line up nice and clean both top and bottom. It can be difficult to see if everything is aligned with longer names. I find it helps to turn my background a wild color for contrast. You will get rid of the color once your done with this step.

Alright, so now all my letters are aligned to each other, the same size, and fit on my document. You want to leave some white space around the edges for your matte. Combine all of your letter layers so that they are one and center the name on your background vertically and horizontally. I find the easiest way to do this, if your new to using PSE, is click the little eye icon on your background layer to hide it. Then right click on your layers and "merge visible" then turn your background layer (eye) back on and align by selecting both layers and using the "align" tool on your top toolbar. It's important that you combine your letter layers first or they will all stack on top of each other when you center!

Now get rid of the wild color in the background and flatten your image. Lock this layer and create a new layer. We are going to create our matte right on top of our art to make it easy to place, then we will transfer it to it's own document to print. On your new layer, choose a complimenting font and use the dash to create a line before and after your text. Make sure the dash turns into a solid line with the font you chose (Amery is a good font for the dash portion). Below you will see my dashed line is still dashed, I changed the line portion to Amery before I went on. I like to include the first names of the bride and groom and the date of their wedding. You can adjust the information if you like, or maybe it's a baby gift and you want to put the babies first and middle name and their date of birth, or height/weight info.

Now that you have everything sized (I like my lines to go just past each end of my letter images. Create a new document (the same doc as last time) and transfer your your text layers (again, merge them first so they keep their proportions, like you did with the letters) to your new doc.

Now print out your two pages, I print my letters on glossy paper and my matte on matte photo paper. You can choose to use a different paper for your matte, but I do find the photo paper makes for a much nicer (professional) looking gift. Once you've picked up your supplies for the first time you make this, you have enough for every wedding or event gift you'll need for a long time!
So now everything is printed out, you need a paper cutter or razor to cut the window in your matte. Stack your papers together and take them over to the window. This will allow you to see how big of a window you need to cut. Use a pencil to make a light mark in each corner then connect the dots with your cutting tool.

Now fit everything into the matte that comes with your frame. I like to use some scrapbooking glue dots to tack everything into place.

Clean your glass really well and put everything into the frame!

Ready to make your own?